
You’re busy and do not want to be interrupted by phone calls. You prefer to have them go straight to voicemail and receive the message via email. You can return the call at your convenience.
With the NumberBarn Call Forwarding service, you can nix the call forwarding and send calls straight to voicemail instead.
This relaxing guide will walk you through the steps of porting your number to NumberBarn from a different service provider and routing calls straight to voicemail.
What is porting?
Porting means transferring your phone number from one service provider to another. Let’s say your number is with Tomato Wireless. You will port your active number from Tomato Wireless to NumberBarn. The number will eventually no longer be with Tomato Wireless and you’ll no longer pay them for service. Instead, you’ll pay NumberBarn. This process takes anywhere from 3-10 business days.
Which plan includes voicemail?
The NumberBarn Call Forwarding plan is the only plan that includes voicemail. Voicemail will use minutes on your plan. Depending on your expected call volume, you can determine which plan will work best for you by taking this quiz:
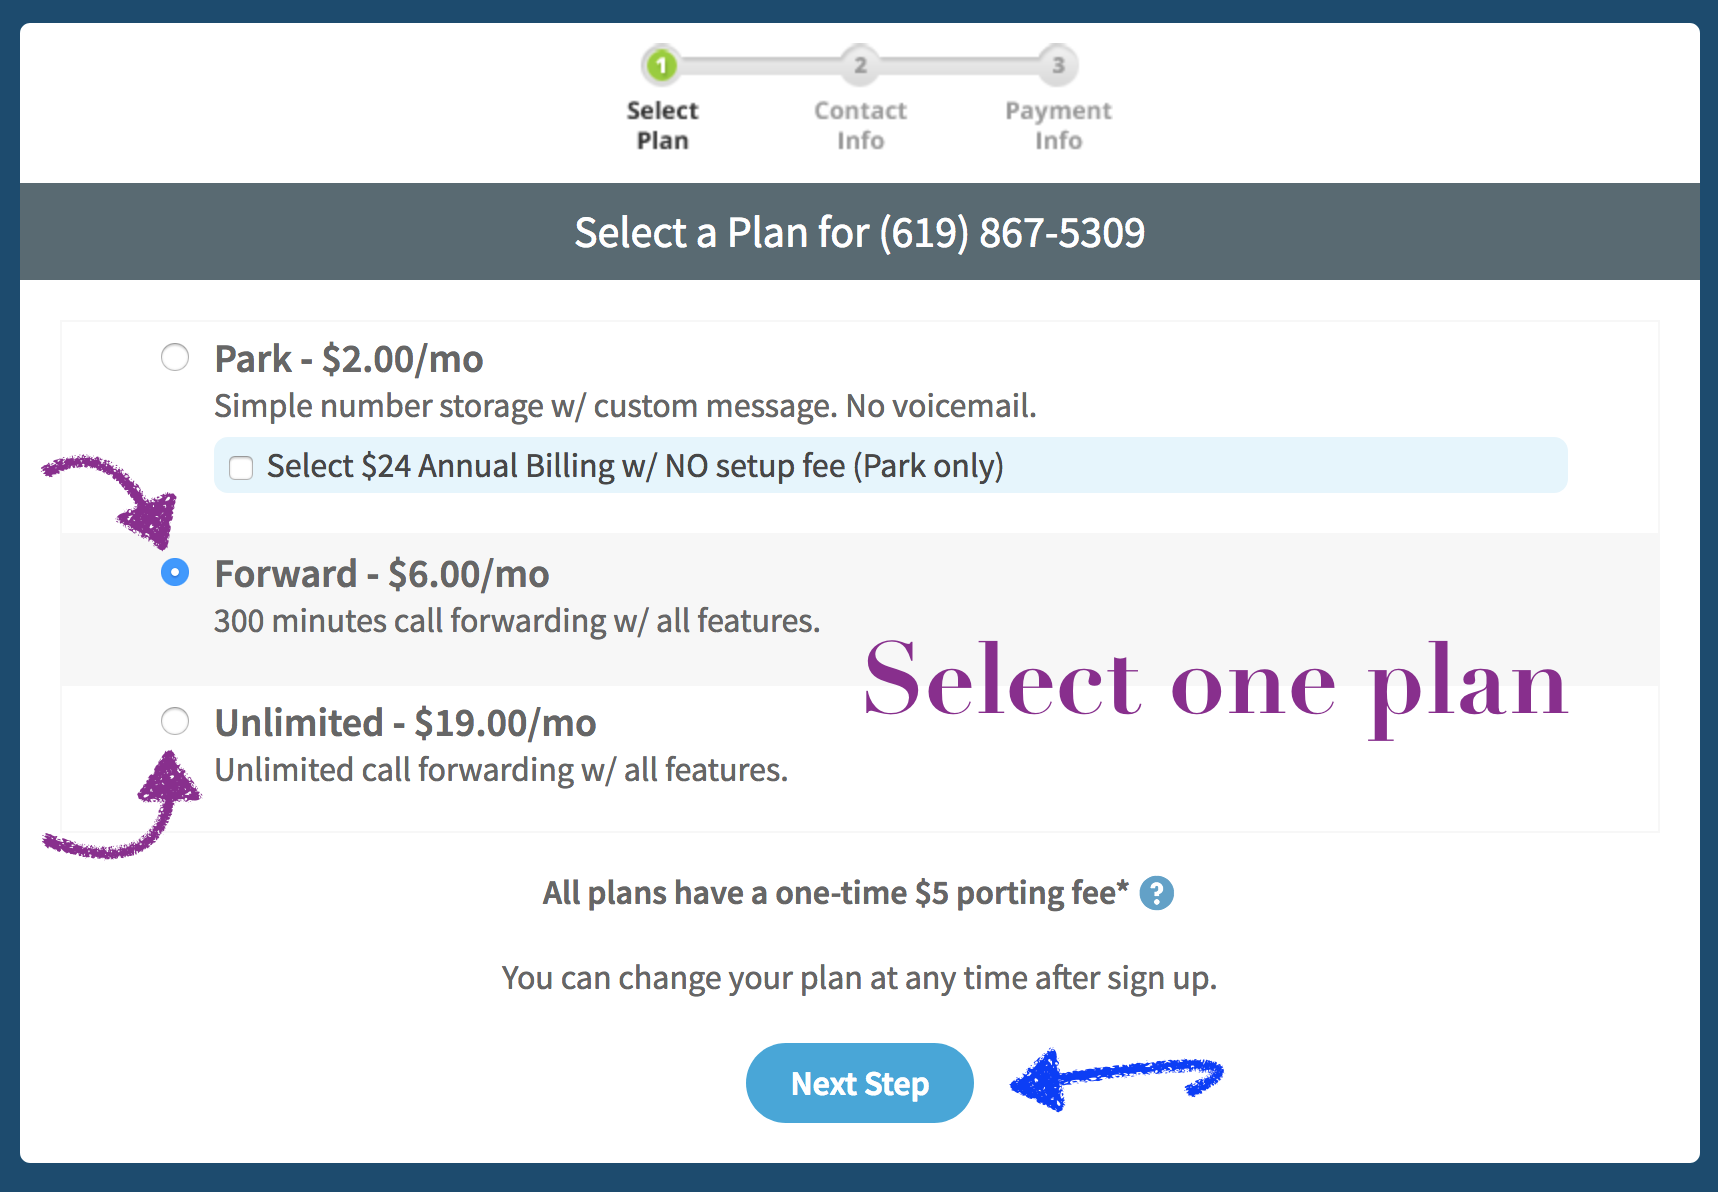
Our call forwarding plans are broken down by minutes per number per month:
- 300 minutes of call forwarding for $6/month + tax
- Unlimited call forwarding* for $19/month + tax
How to begin
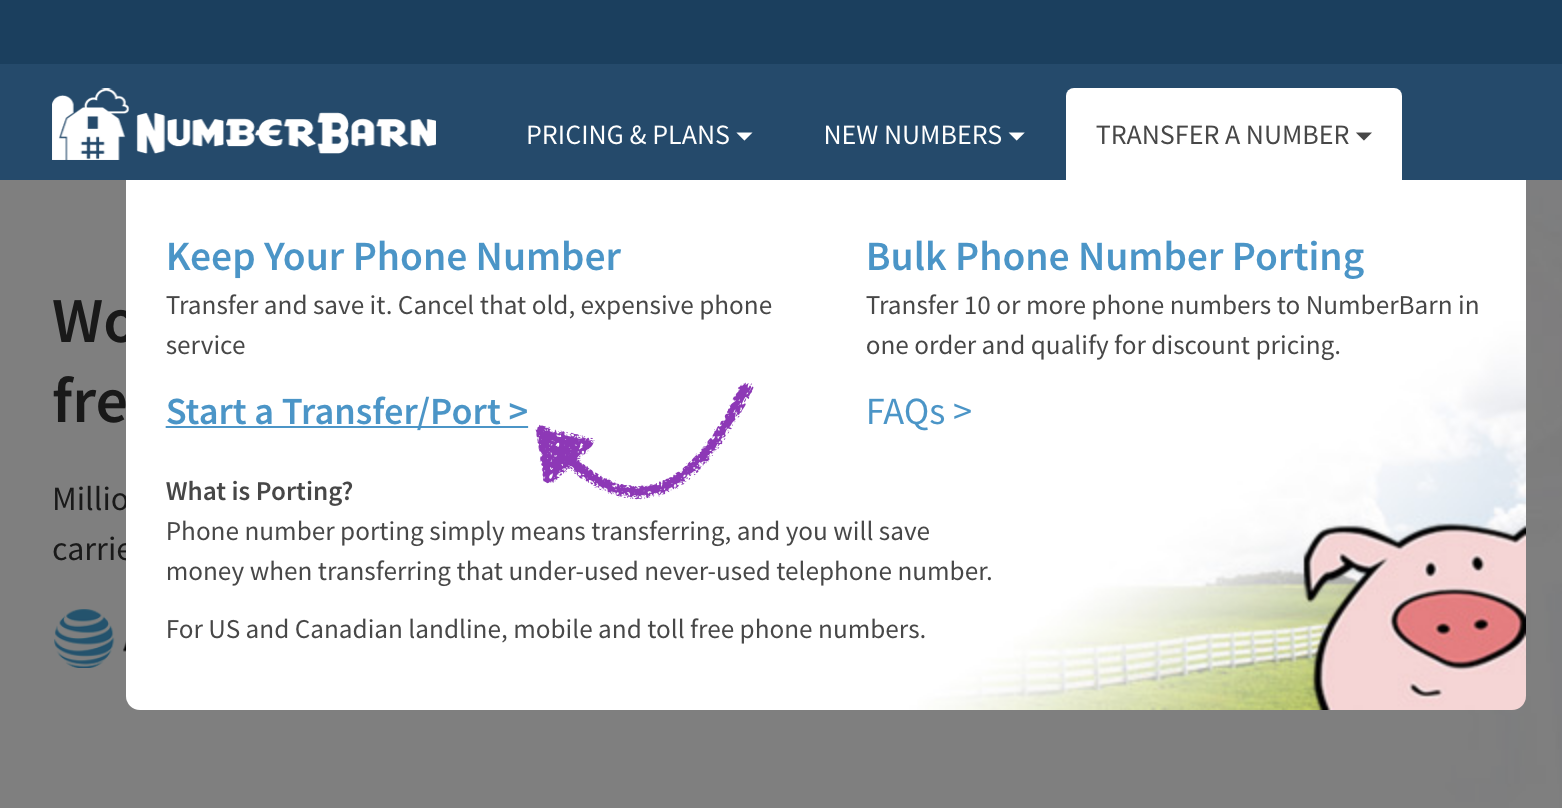
- From our main website, https://www.numberbarn.com, select Transfer a Number.
- Select Start a Transfer/Port.
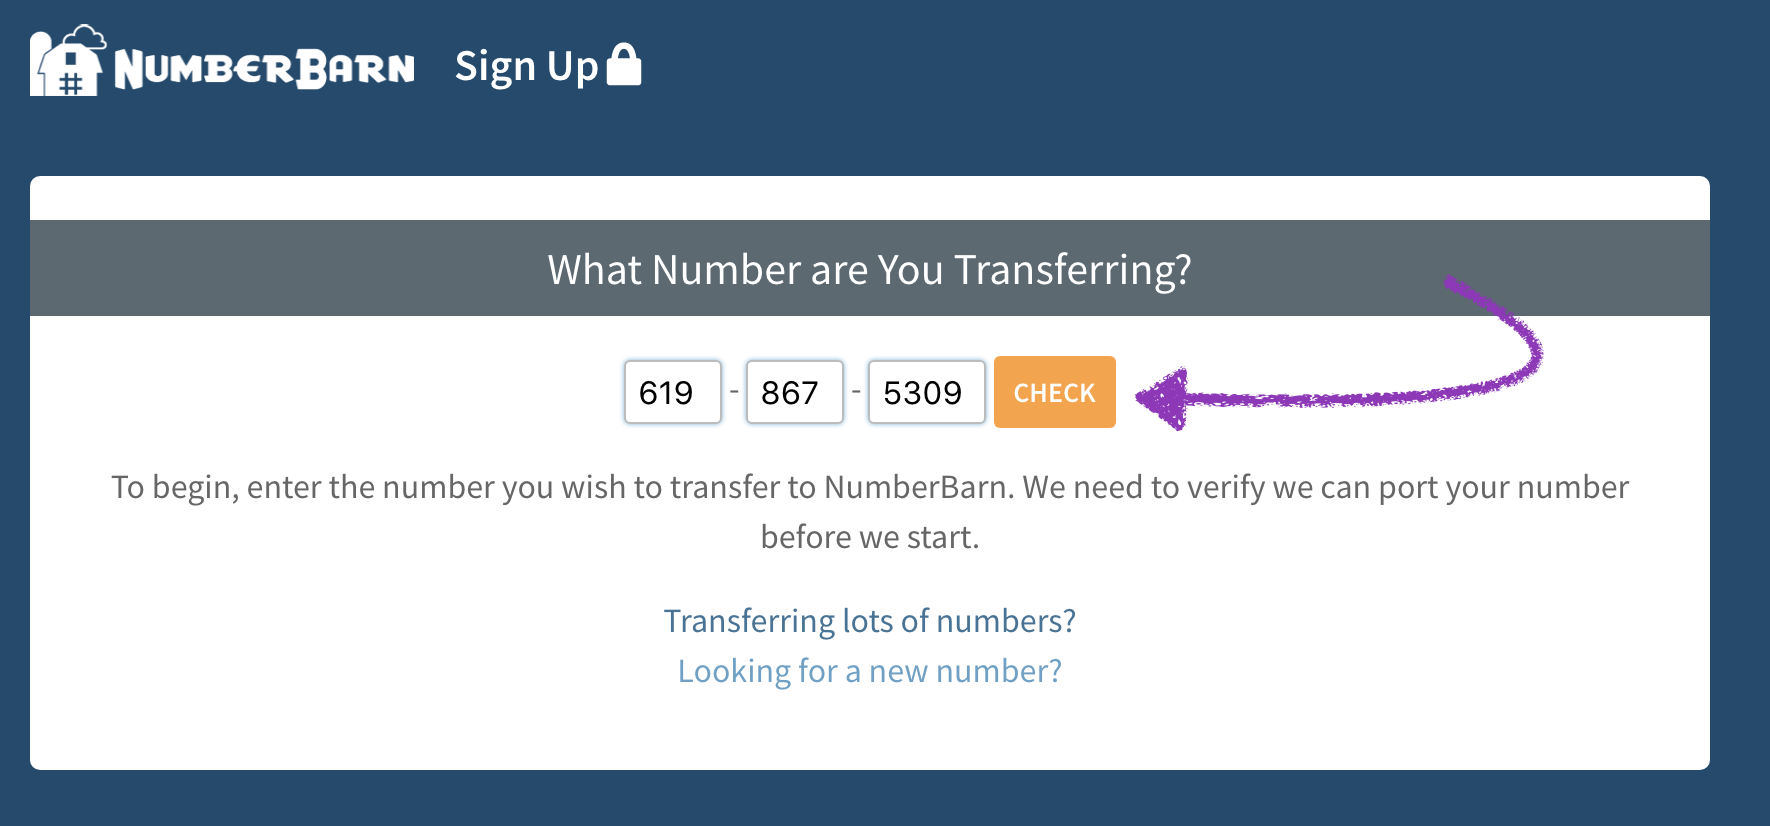
- Enter the phone number you would like to port. Hint: Hit the tab key to enter numbers into the next box.
- Select the Check button.
We check to make sure we can support the city and state of your number on our network. When you select the Check button, we do not check:
- If your number is active
- If your number is portable
- If you have any contractual obligations or service bundles on your account
The items above are your responsibility to verify, as a phone number owner. If you’re not sure, you’ll want to check with your current service provider.
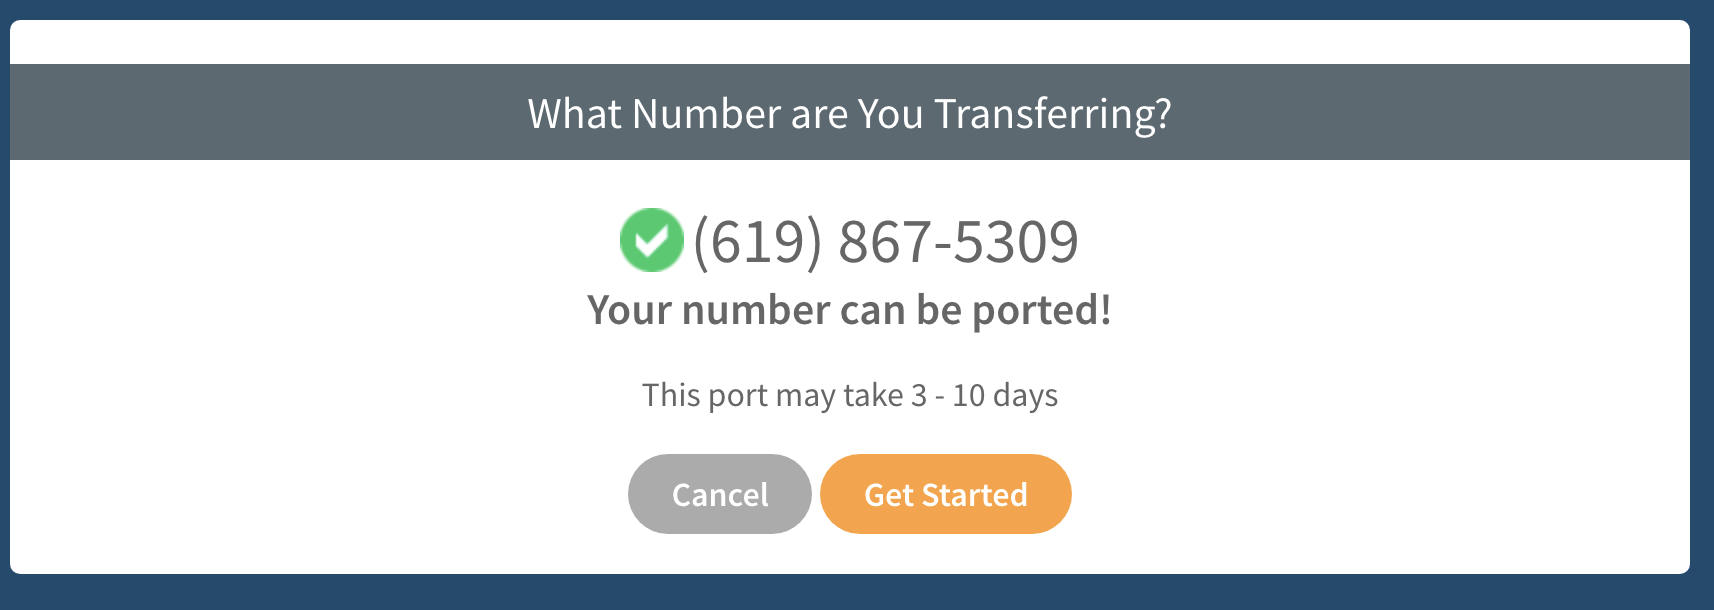
- If you see the green checkmark, great! You can begin your port request to NumberBarn.
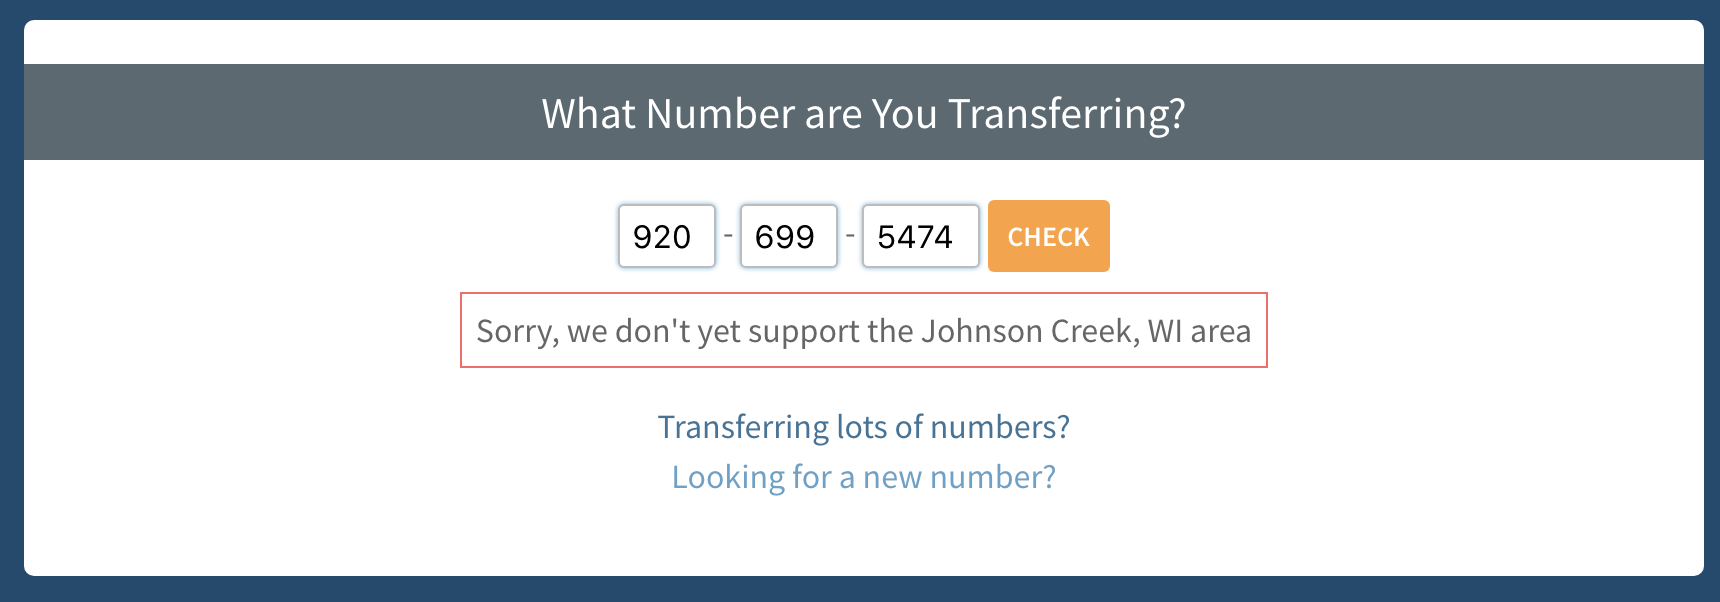
- If you see a red box, it means we do not support your area yet. We might be able to make some magic happen. Please reach out to our customer support for assistance.
For those with a green checkmark, please continue to read ahead for the next steps:
- Select the Get Started button to go to the next step.
- Select the a Call Forwarding plan.
- Select Next Step.
- Enter the contact information that is on file with your current provider. Note the information on this page must match what is currently on file with your existing provider.
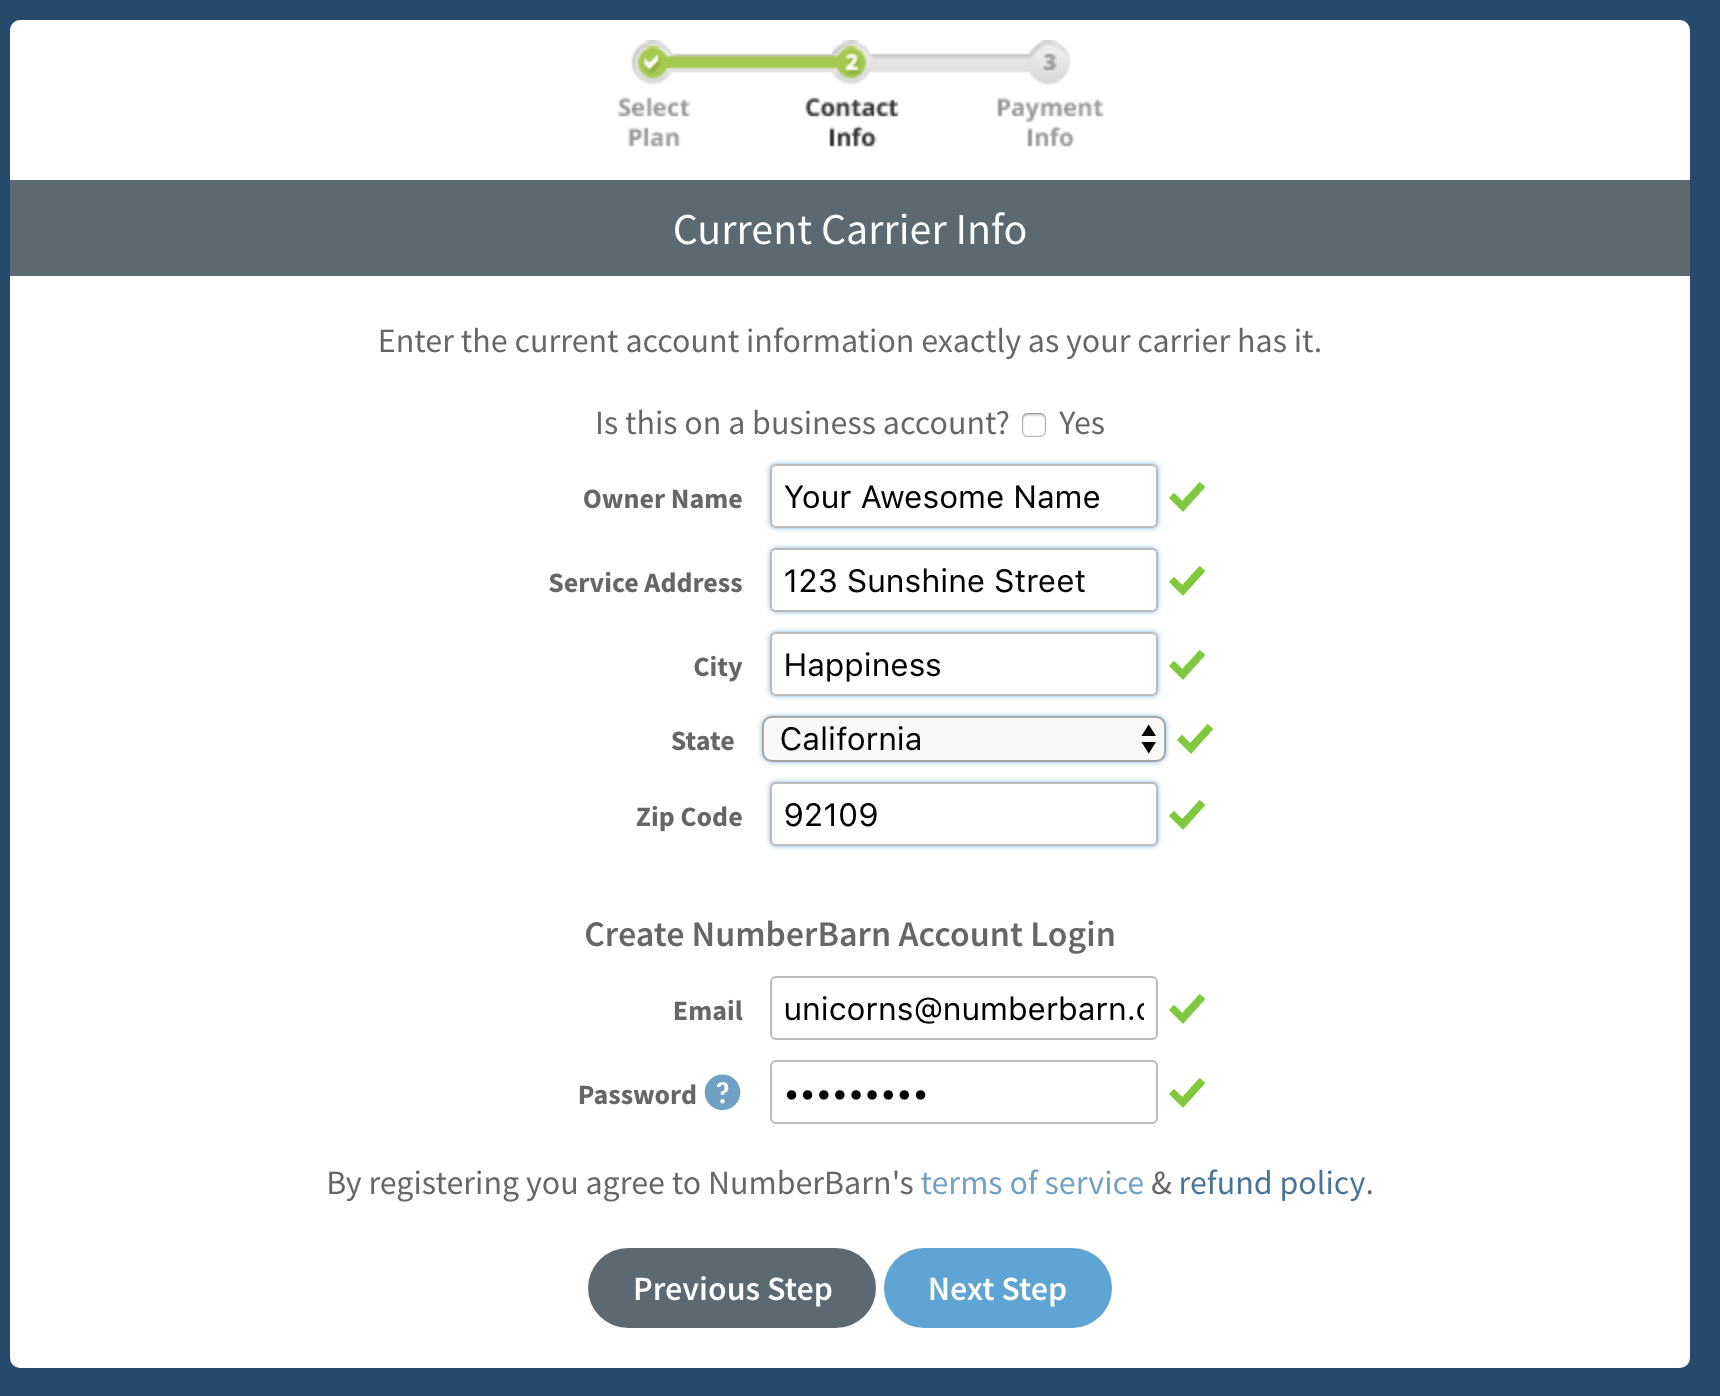
- Enter the email address to place on file in your new account. Note the email you enter here will also be the login to your account and the email on file for notifications.
- Enter a password. Passwords must be at least 6 characters and contain at least one letter and one number.
- A green checkmark mean your information fits into our text fields. If you see a red checkmark, it means there is an error with your information.
- Select Next Step.
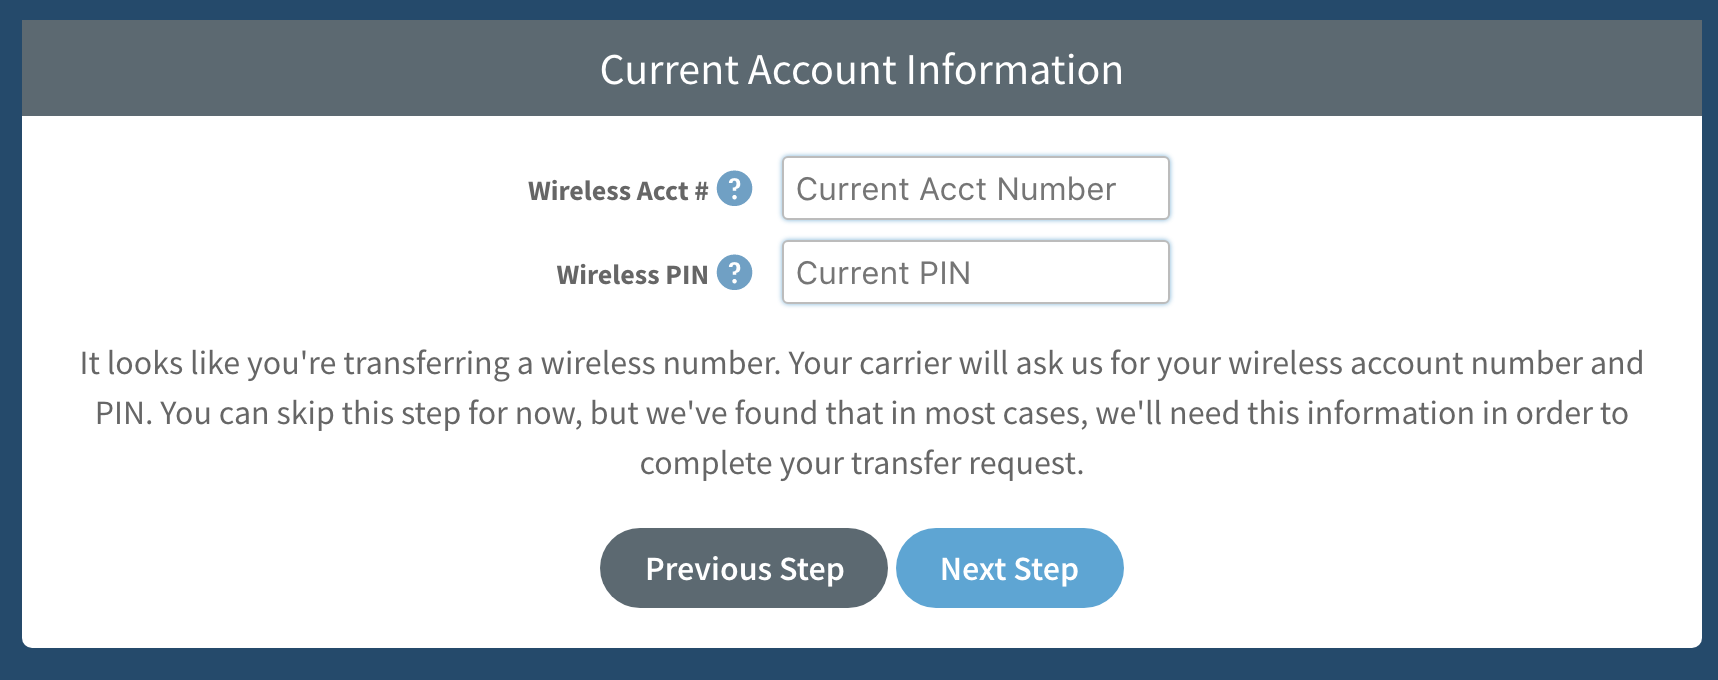
- If the number you are porting is a wireless number, enter your account number and PIN.
- Select Next Step.
- Note the account number and PIN are required by your current service provider to port away and only used for internal purposes. They will not be stored on your NumberBarn account.
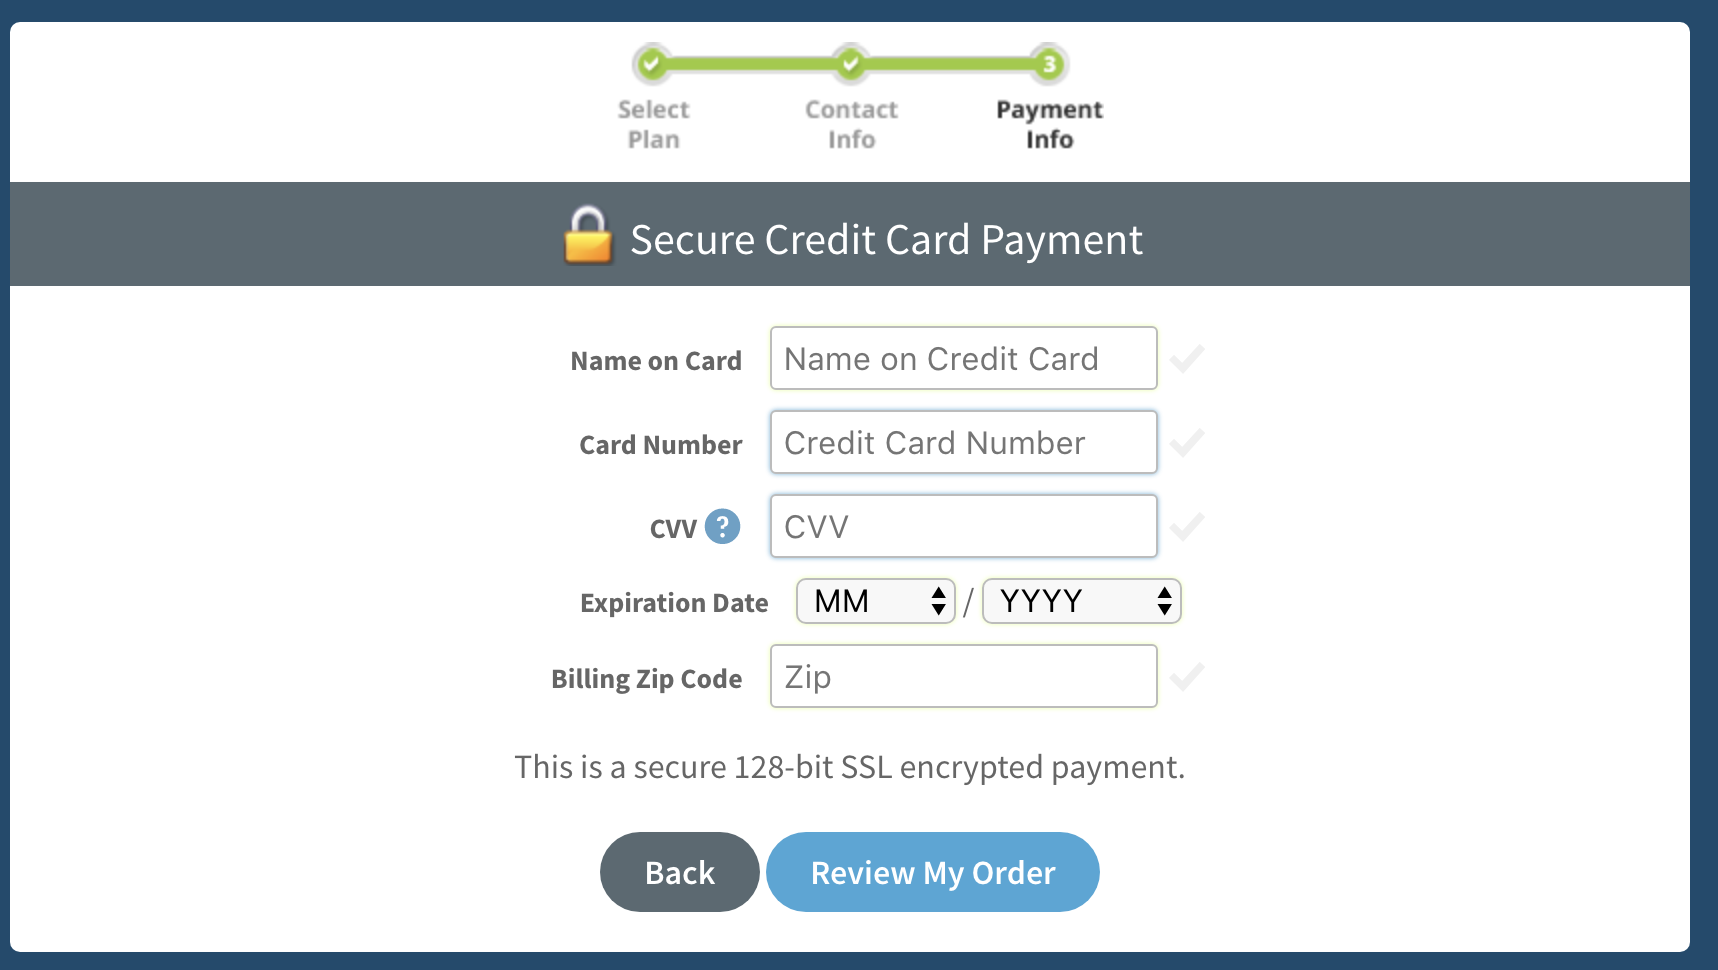
- Enter your payment information.
- We will bill you when your number port completes to your account and then on a monthly basis around that same date every month.
- Select Review My Order.
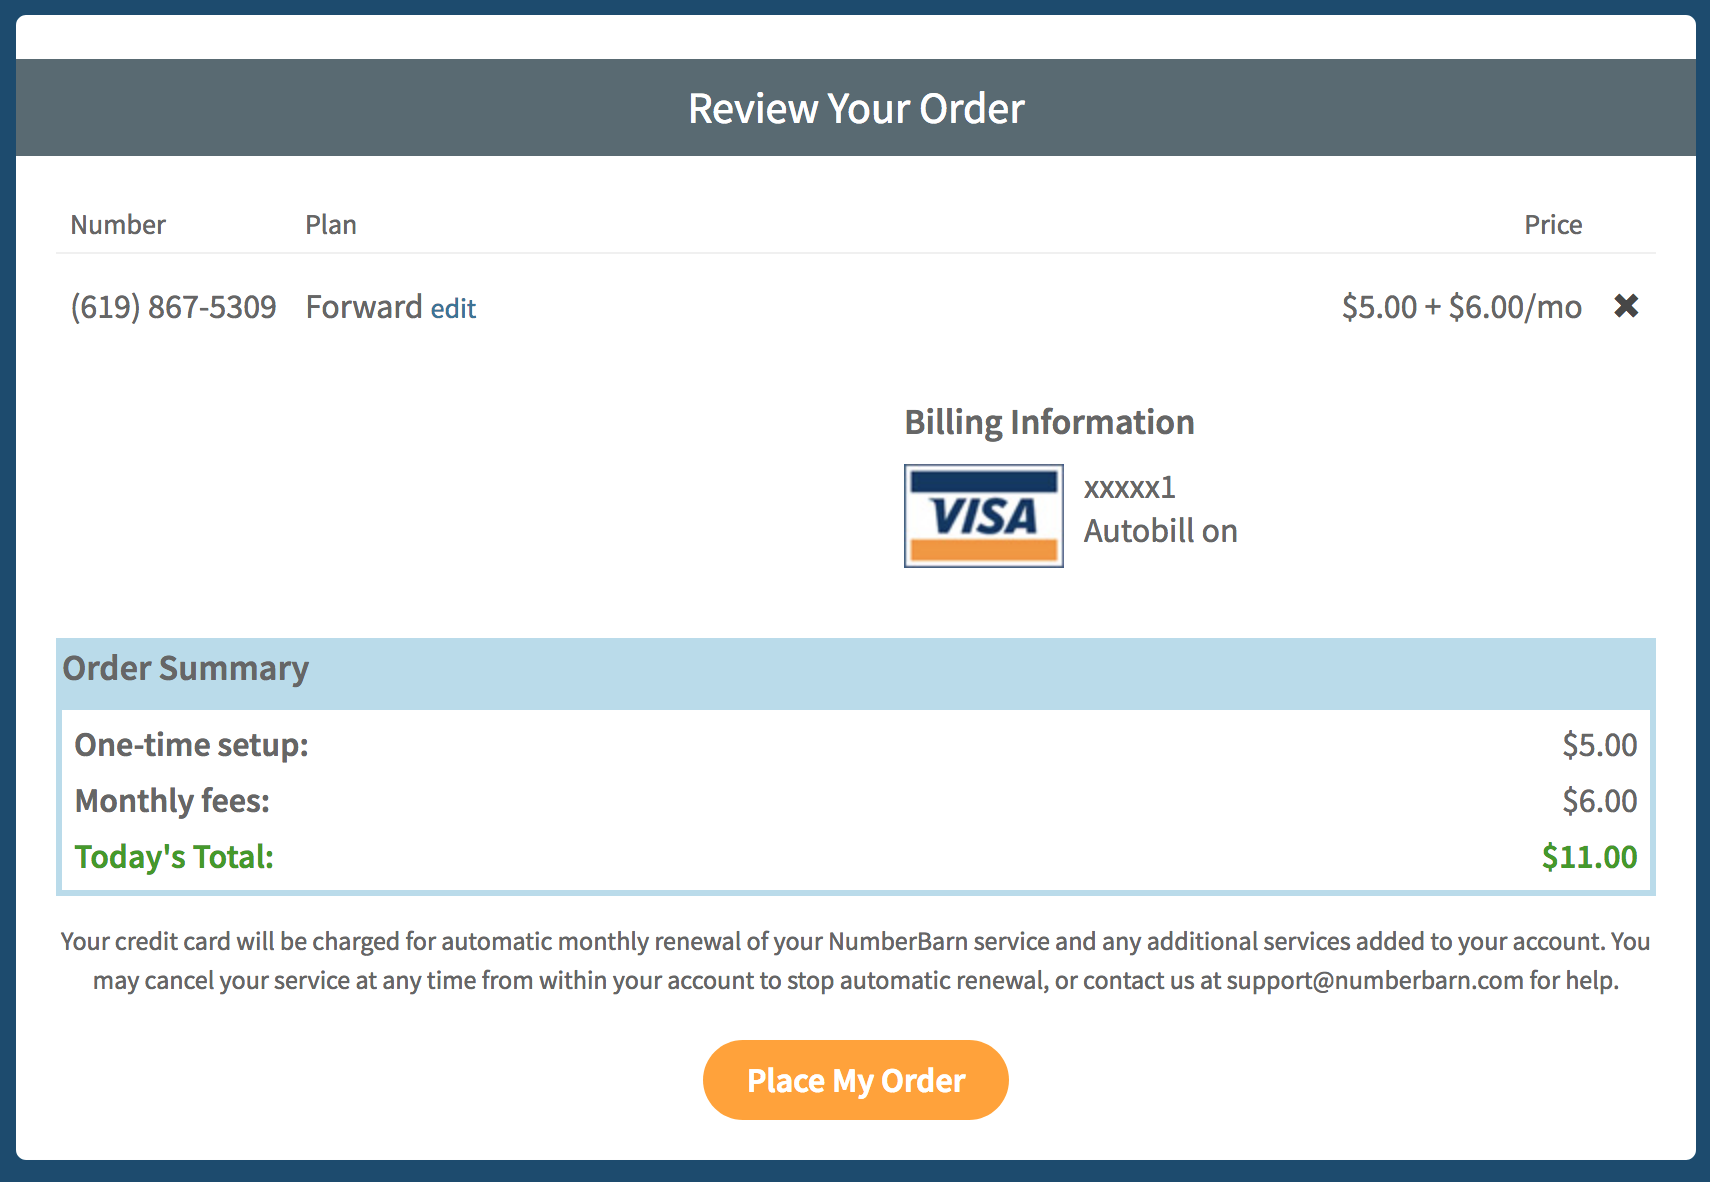
- If you need to make any changes, select edit.
- If everything looks good, select Place My Order.
What happens next: Authorize your Port Request
Congrats! You have successfully initiated your port request. Now, you must verify your number and authorize the port. This tells us that you are the rightful owner of the phone number and gives us permission to submit your port to your current provider for review. Here’s how to make that happen:
What happens next: Waiting for a status update
After you have authorized your number port, we send the port request to your current provider for review.
- Do not cancel your number with your current service provider.
- When they approve the port, we’ll notify you of the date in which it is scheduled to port.
- If the port is rejected, we’ll notify you and let you know why.
- Porting takes anywhere from 3-10 business days to complete.
Configure your settings
During the time you are waiting for a status update, you can configure your number settings. We recommend the proactive step of doing this prior to your number porting.
Record your voicemail greeting
From within your account:
- Select Voicemail & Text
- Locate the audio player labeled My Voicemail Message
- Select Change
Options available:
- Upload an mp3 or wav file
- Record an outgoing message over your phone
Voicemail Notifications
To receive voicemail notifications to your email address, login to your NumberBarn account. Then:
- Select Numbers from the navigation bar
- Select your number from the list
- Select the Voicemail & Text tab
- Enable Forward Text to Email
- Enter your email address(s) into the text fields
- Save your changes
What happens next: Porting status updates
When your port request is approved:
- We email you to confirm the scheduled date of porting. The subject line of this email will be, “Transfer Approved: (xxx) xxx-xxxx“.
- On that date, we will email you to let you know your number has activated. The subject line of this email will be, “Transfer Complete: (xxx) xxx-xxxx“.
- All support notifications come from our address of “support@numberbarn.com“.
- On the date in which your number ports to us, is will then be safe to cancel your account with your existing provider.
- You must contact your service provider to cancel your account. We do not cancel accounts with other service providers on your behalf.
How to listen to voicemail once your number ports
With NumberBarn, there is no voicemail inbox, login or password. Your messages are delivered directly to your email as a .wav audio file you can listen to in your email, download, save and forward. You can also listen to messages from your account call logs.
There are two ways in which you can listen to voicemail:
- From your email
- From your online account (on mobile or desktop)
Listening to voicemail from your email
If your email notifications are set to “on”, you will receive an mp3 voicemail message file to your email address. You can then listen to that file from your email. To learn how to enable your voicemail notifications, visit the Voicemail Notifications To Your Email article.
We store your voicemail messages on our server for 60 days. If you’d like to keep the message longer than 60 days, save the file to your computer. Saving it in your email will not save it to your computer.
Listening to voicemail from your NumberBarn account
You can listen to your voicemail messages when logged into your NumberBarn account on a desktop or mobile device. To listen:
- Select Call Logs from within your account
- Find the Voicemail icon to the right of your call
- Click the icon to play your message
For answers to more questions, hop over to our Knowledge Base.
We’re NumberBarn, we take phone numbers very seriously. But, we also like to have a little fun. To learn more about us, visit NumberBarn.com and follow us on Facebook, Instagram and Twitter.